Hey!
The sweet Jin from Superficially Colorful requested that I did a tutorial for the Saran wrap Manicure, and as her wish is my command, here it is. This is my first photo tutorial ever, so I would be very grateful if you could leave your input; I'm thinking "what was good? what was crap? how could I improve the thing?" and anything in between :)
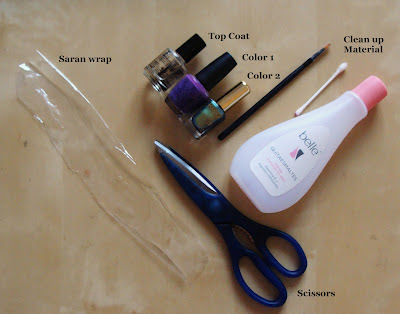
Fist things first: What do you need?
I'm sure you will have everything you need at hand; only note that you will need as many pieces of saran wrap as nails you intend to enhance. This implies that you will work on a previous dry base, usually another nail polish, or even your dry transparent base coat. If you are using a fast dry top coat, you don't need to wait for a long time; 15-20 minutes would be enough.
1. Make the Saran wrap balls
I'd recommend to prepare the saran wrap balls before starting the whole process, and keep them at hand. You still will have to tighten them up right before using them, but having them already half prepared will help. As for how to do the balls, feel free to do them as you please, but take care not to have uniform surfaces. I'd say the sloppier the better.
2. Paint a thick coat of polish over your base
You already master this step so there's no need of explanations. Unless you are super woman, avoid fast drying polishes in this step, for the sake of the next one.
3. Press the saran wrap on the wet polish
The only important thing here is that you have to do it quick, so that the second polish is still wet and can adhere to the saran wrap. The effect will be more dramatic if you press the ball harder to your nail than if you do it softly. Also, feel free to press the saran wrap on the nails as many times as you need to get the effect you are looking for. Anyhow, avoid pressing the wrap twice in the same exact spot, unless you want to take out much more color; doing so can create a gap of color rather evident.
You should end up with a result more or less like so:
Note that one saran wrap ball can be used two times by undoing it and redoing it while taking care the polish is placed inside of it. That can help if you do not have enough wrap, you are willing to help the planet by wasting less of it or your cat has fancied playing with some of your pre-prepared balls.
4. Clean up
After finishing one hand, proceed to clean up and seal it with fast drying top coat. Wait for five minutes and do the other hand. Voilà.
Final result:
I hope you found this tutorial somewhat helpful and fun. I'll be waiting to see your Saran wrap manicures around!
M.


Great tutorial, I think there's nothing to improve. Good job and thanks for the instructions :)
ResponderEliminarWoah!!! Thank you SO SO SO MUCH!!!!!
ResponderEliminarAnd the tutorial looks amazing!! I will try it when I get home and let you know if I can work with it ;-)
So AWESOME!!! Thanks!!! ♥
Awesome tutorial!!! Thanks for the environmental concern and I'd love to see your cat!
ResponderEliminarBrilliant tutorial :)
ResponderEliminarthats so cool!
ResponderEliminaroooh great tutorial! I wondered how saran wrap manis were done, and after seeing your explanation, I can clearly picture in my head all the steps. thanks! :-)
ResponderEliminar~ Yun
Great tutorial! I love photo ones because then I can study at my own pace. :)
ResponderEliminarThank you all :D
ResponderEliminarIt all makes sense now! For some strange reason, I had it in my head that you used the cling wrap to dab on the polish, not use it to pull off the wet polish! Great tutorial!
ResponderEliminarThanks I have to try it out!!!
ResponderEliminarYour tutorial is perfect, and I'm so glad you put it up! I saw the original post first where you used this technique, and I was immediately craving it on my own nails! Now I know how to do it, and I already know what polishes to use. Thank you! :D
ResponderEliminarvery nice ideea.i like your posts,let's follow each other.my blog http://pictura-pe-unghii.blogspot.ro/
ResponderEliminarLove this tutorial! just tried it out today, unfortunately for me I'd be needing a few more try out to get them looking as nice as yours! Thanks for this awesome tutorial :)
ResponderEliminarI like the picture tutorials sometimes better than the video ones, especially for a technique like this. Thanks for the post - it helped.
ResponderEliminarReally a great addition. I have read this marvelous post. Thanks for sharing information about it. I really like that. Thanks so lot for your convene. sns nails
ResponderEliminar